
จากตอนที่แล้ว เราสามารถทำ Docker registry แบบง่าย ๆ โดยใช้ basic authentication (htpasswd) สำหรับในตอนนี้ เราจะมาทำ Harbor ซึ่งเป็น docker registry ที่มีผู้พัฒนาให้เราสร้างได้ง่ายมากขึ้น และเพิ่มขีดความสามารถให้เราเชื่อมต่อ LDAP/AD เพื่อทำ user authentication และอื่น ๆ อีกมาก
ผมทดสอบกับ ubuntu server เวอร์ชั่น 16.04 สมมติว่า เราจดชื่อ FQDN ไว้คือ docker-registry.in.psu.ac.th
ให้แก้ไข hostname ให้ถูกต้อง ดังนี้
$ sudo vi /etc/hostname
docker-registry.in.psu.ac.th
สั่งรีบูตเครื่อง
$ sudo reboot
ติดตั้ง ssl certificate เนื่องจากเรายังไม่ได้ใช้ certificate ที่ซื้อมา เราจะใช้ ssl-cert-snakeoil ไปก่อนก็ได้
$ sudo apt install ssl-cert
ก่อนจะทำในขั้นตอนต่อไป ขณะนี้ได้ติดตั้ง docker ไว้แล้ว วิธีติดตั้งดูจากเรื่อง เตาะแตะไปกับ Docker ตอนที่ 1 Containers (Build, Ship and Run)
หลังจากติดตั้ง docker แล้ว ในการติดตั้ง harbor จะต้องติดตั้ง docker-compose เพิ่ม ทำดังนี้
$ sudo apt install docker-compose
ติดตั้ง harbor
$ wget https://github.com/vmware/harbor/releases/download/v1.1.2/harbor-offline-installer-v1.1.2.tgz
$ tar xvf harbor-offline-installer-v1.1.2.tgz
$ cd harbor/
แก้ไขค่า hostname, ui_url_protocol และ ssl_cert ดังนี้
$ vi harbor.cfg
#set hostname
 hostname = docker-registry.in.psu.ac.th
 #set ui_url_protocol
 ui_url_protocol = https
 ......
 #The path of cert and key files for nginx, they are applied only the protocol is set to https
 ssl_cert = /etc/ssl/certs/ssl-cert-snakeoil.pem
 ssl_cert_key = /etc/ssl/private/ssl-cert-snakeoil.key
ทำการติดตั้ง
sudo ./install.sh
เข้า web browser ไปยัง https://docker-registry.in.psu.ac.th

login เข้าเป็น username admin ในครั้งแรกจะได้รหัสผ่านคือ Harbor12345
แล้วตั้งค่า configuration ตัวอย่างเช่น Authentication ด้วย OpenLDAP แบบ Anonymous Bind ที่เครื่อง ldap server IP คือ 10.168.16.18 ดังนี้
เข้าเมนูตามลำดับดังนี้ Administration > Configuration > Authentication
ใส่ข้อมูลเฉพาะช่องที่แนะนำ

Auth Mode: LDAP
LDAP URL*: ldaps://10.168.16.18
LDAP Base DN*: dc=example,dc=com
LDAP UID*: uid
หากเราใช้ AD และเป็น LDAPS แบบ simple bind จะต้องใส่ข้อมูลใน 2 บรรทัดนี้ด้วย เช่น ldaps ของที่ทำงานของผม (psu.ac.th)
LDAP Search DN:
LDAP Search Password:
LDAP UID*: sAMAccountName
กด SAVE แล้วกด TEST LDAP SERVER เพื่อดูว่า connect ldap server ได้หรือไม่
ให้ logout ออกจาก username admin
ให้ login ด้วย username ของ ldap server เช่น lulu

แล้วสร้าง project เช่น job1 (ผมพบว่า หากเรามี user มาใช้ร่วมด้วยหลาย ๆ คน ให้ตั้งชื่อ project ให้ตรงกับชื่อ username เพราะว่า user แต่ละคนไม่สามารถใช้ชื่อ project ซ้ำกันกับของอีกคนได้)

ผลลัพธ์

ที่ Harbor registry อาจจำเป็นต้องตั้งค่า TLS_REQCERT เป็น never เพื่อติดต่อกับ ldaps server เฉพาะบางเครื่อง ให้เพิ่มคำสั่งดังนี้
$ sudo sh -c 'echo "TLS_REQCERT never" >> /etc/ldap/ldap.conf'
หากมีการแก้ไข configuration files สำหรับ Harbor ให้ทำขั้นตอนตามลำดับดังนี้
$ docker-compose down
$ vi harbor.cfg
$ sudo ./prepare
$ docker-compose up -d
ที่เครื่อง client หากเจอแบบนี้ ก็เพราะว่า ไม่ได้ใช้ certificates จริง
$ docker login docker-registry.in.psu.ac.th
Username: lulu
Password:
Error response from daemon: Get https://docker-registry.in.psu.ac.th/v2/: x509: certificate signed by unknown authority
เนื่องจากไม่ได้ใช้ certificates จริง เราต้องทำที่ client ทุกเครื่อง ด้วยคำสั่งเหล่านี้ ก่อนที่จะใช้งานกับ Harbor Registry ได้ ทำดังนี้
$ export DOMAIN_NAME=docker-registry.in.psu.ac.th
$ openssl s_client -connect $DOMAIN_NAME:443 -showcerts </dev/null 2>/dev/null | openssl x509 -outform PEM | sudo tee /usr/local/share/ca-certificates/$DOMAIN_NAME.crt
$ sudo update-ca-certificates
จากนั้นต้อง restart docker ด้วยคำสั่งดังนี้
$ sudo service docker restart
ทดสอบ login อีกครั้ง
$ docker login docker-registry.in.psu.ac.th
Username: lulu
Password:
Login Succeeded
ทดสอบ push image
ไป pull image จาก hub.docker.com สัก 1 อัน เช่น
$ docker pull woonpsu/docsdocker:part1
ใส่ tag ก่อน push image ไปยัง Harbor registry ที่ project ชื่อ job1 ตั้งชื่อ image ว่า hellolulu
$ docker tag woonpsu/docsdocker:part1 docker-registry.in.psu.ac.th/job1/hellolulu
ทำการ push image
$ docker push docker-registry.in.psu.ac.th/job1/hellolulu
แล้ว logout
$ docker logout docker-registry.in.psu.ac.th
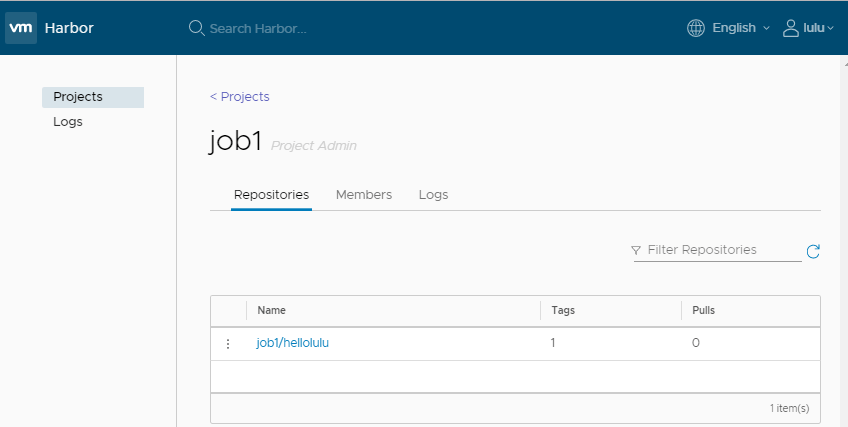
ดูในหน้าเว็บเพจของ Username ชื่อ lulu และ project ชื่อ job1 จะมี image ที่ upload ขึ้นมาไว้ ดังรูป
เราได้รู้จักกับคุณสมบัติ 1 เรื่องของ Harbor Registry ซึ่งยังมีอีกมากครับ แต่ตอนนี้ ผมคิดว่าเอาแค่นี้ก่อนนะ
เพิ่มเติม (9 ต.ค. 60)
หากพบว่าจำเป็นต้องสั่งคำสั่ง docker-compose up -d ทุกครั้งหลังจากเปิดเครื่อง ผมพบว่าวิธีแก้ไข คือ นำบรรทัดข้างล่างน่ี้ไปใส่ไว้ในไฟล์ /etc/rc.local (ก่อนบรรทัด exit 0) อย่าลืมเปลี่ยนคำว่า username เป็นชื่อ user ที่คุณใช้งานด้วยนะ
cd /home/username/harbor ; docker-compose up -d ; cd
exit 0
หาก Harbor ใช้งานได้ปรกติทันทีหลังจากเปิดเครื่อง ก็ไม่ต้องใช้วิธีแก้ไขอันนี้
References:
https://github.com/vmware/harbor
https://github.com/vmware/harbor/blob/master/docs/installation_guide.md
https://success.docker.com/KBase/I_get_%22×509%3A_certificate_signed_by_unknown_authority%22_error_when_I_try_to_login_to_my_DTR_with_default_certificates
Leave a Reply
You must be logged in to post a comment.