Day: July 15, 2019

  • Hello…Flatpickr!!

    หลายคนอาจะเคยพบปัญหาการเลือก วัน เดือน ปี ในcalendar การกรอกข้อมูลที่เป็นวันที่ใน web ต่างๆ การเลือกช่วงวันที่ใช้งานยาก โดยเฉพาะในการเลือก ช่วงเวลา ที่ย้อนหลัง ไปหลายปี บาง web อาจต้องกดเลื่อนเดือนที่ละเดือนไปเรื่อยๆ ต้องใช้เวลานาน ทำให้รู้สึกเบื่อ… วันนี้เราจะมานำเสนอ Flatpickr ที่เป็นไลบรารี่ javascript ใช้สำหรับรับ input ที่เป็น datetime picker ที่ยืดหยุ่น มีขนาดเล็กและใช้ง่าย โดย output ที่ได้จะเป็น String ตาม format ที่เราต้องการ

    Flatpickr js รูปแบบจะเป็นแนว Lean กับ UX-driven สามารถใช้งานได้กับ JS ธรรมดาหรือ jQuery โดย Flatpickr รองรับภาษาไทยได้โดยเลือก Localization เป็นไทยเพื่อให้สามารถแสดงเป็นภาษาไทย และรองรับรูปแบบเวลาที่แสดง 24 ชม. เพราะจะเข้าใจง่ายกว่า AM กับ PM ซึ่ง library อื่นๆ อีกหลายตัวยังไม่สามารถรองรับ จุดเด่น คือ มีความสวยงาม ไม่ต้องการ dependencies ใดๆ สามารถใช้งานได้ทันที

    การใช้งานสามารถใช้ได้ง่ายๆ โดยใช้แค่ 2 ไฟล์ ก็สามารถใช้ option ได้เกือบครบ ซึ่งไฟล์ ที่จำเป็นประกอบด้วย ไฟล์ js 1 ไฟล์ และ ไฟล์ css 1 ไฟล์

    <link rel=”stylesheet” href=”flatpickr.css”>

    <script src=”flatpickr.js”></script>

    ถ้าใช้งานร่วมกับ jquery ก็ต้อง เพิ่ม library jquery เข้ามาด้วย

      <script src=”jquery.min.js”></script>

    การใช้งาน

    $(“.selector”).flatpickr(
    optional_config
    );

    ตัวอย่างกล่อง input ที่ใช้เลือก วันที่

     <input type=”text” id=”timePicker” placeholder=”Please select Time”>

    การแสดงเวลาแบบ Basic
    $(“#basicDate”).flatpickr({
    enableTime: true,
    dateFormat: “F, d Y H:i”,
    time_24hr: true
    });

    ภาพที่ 1 ฺBasic Calendar

    เราสามารถกำหนดช่วงของวันที่ค้นหาได้ง่ายขึ้น เนื่องจากมี Range Calendar (ภาพที่ 2) ให้ใช้งาน หรือจะเป็นเลือกแบบ Multiple เลือกทีละหลายๆวันก็ได้ และยังมี Plugin หรือ Theme ให้เลือกใช้งานอีกด้วย

    การแสดงเวลาแบบ Range Datetime
    $(“#rangeDate”).flatpickr({
    mode: ‘range’,
    dateFormat: “Y-m-d”
    });

    ภาพที่ 2 Range Calendar
  • Xamarin Essentials : Easy access Native feature Platforms

    ในบางครั้งการเขียน app เพื่อ access location ปัจจุบันของผู้ใช้ หรือต้องการสั่งให้โทรศัพท์สั่นตาม activity ที่ตั้งไว้ หรือแม้แต่จะ access ข้อมูล device information ของอุปกรณ์ ไม่ใช่เรื่องง่ายเลยสำหรับเหล่า developer ที่เขียน mobile app ยิ่งมีหลาย platform ไม่ว่าจะเป็น android , iOS, Windows ก็มีวิธีการเขียน code การขอ Access permission คนละรูปแบบไปอีก ซึ่งบทความนี้ผู้เขียนจะมาแนะนำให้รู้จักกับ Xamarin Essentials ที่จะมาเป็นตัวช่วยให้ผู้พัฒนาเขียน code แก้ปัญหาเหล่านี้ได้ง่ายขึ้นนั่นเอง

    Xamarin.Essentials คืออะไร?

    คือ  official library ที่ทาง Microsoft ได้พัฒนาและรวบรวม library ที่เป็น cross-platform APIs สำหรับให้นักพัฒนา mobile app ที่พัฒนาด้วย Xamarin.Forms ได้ใช้งานในการเข้าถึง native features ของแต่ละ platforms ด้วยการเขียน code จากที่เดียว

    มีอะไรให้เรียกใช้บ้าง

    ปัจจุบันมีทั้งหมด 33 feature ให้เรียกใช้งาน อ้างอิงจาก Microsoft Doc ซึ่งมีดังนี้

    • Accelerometer – Retrieve acceleration data of the device in three dimensional space.
    • App Information – Find out information about the application.
    • Barometer – Monitor the barometer for pressure changes.
    • Battery – Easily detect battery level, source, and state.
    • Clipboard – Quickly and easily set or read text on the clipboard.
    • Color Converters – Helper methods for System.Drawing.Color.
    • Compass – Monitor compass for changes.
    • Connectivity – Check connectivity state and detect changes.
    • Detect Shake – Detect a shake movement of the device.
    • Device Display Information – Get the device’s screen metrics and orientation.
    • Device Information – Find out about the device with ease.
    • Email – Easily send email messages.
    • File System Helpers – Easily save files to app data.
    • Flashlight – A simple way to turn the flashlight on/off.
    • Geocoding – Geocode and reverse geocode addresses and coordinates.
    • Geolocation – Retrieve the device’s GPS location.
    • Gyroscope – Track rotation around the device’s three primary axes.
    • Launcher – Enables an application to open a URI by the system.
    • Magnetometer – Detect device’s orientation relative to Earth’s magnetic field.
    • MainThread – Run code on the application’s main thread.
    • Maps – Open the maps application to a specific location.
    • Open Browser – Quickly and easily open a browser to a specific website.
    • Orientation Sensor – Retrieve the orientation of the device in three dimensional space.
    • Phone Dialer – Open the phone dialer.
    • Platform Extensions – Helper methods for converting Rect, Size, and Point.
    • Preferences – Quickly and easily add persistent preferences.
    • Secure Storage – Securely store data.
    • Share – Send text and website uris to other apps.
    • SMS – Create an SMS message for sending.
    • Text-to-Speech – Vocalize text on the device.
    • Unit Converters – Helper methods to convert units.
    • Version Tracking – Track the applications version and build numbers.
    • Vibrate – Make the device vibrate.

    วิธีใช้งาน

    เปิด Xamarin.Forms project ขึ้นมา และไปที่เมนู Tools -> Nuget Package Manager -> Manage Nuget Package for Solution และในช่อง Search ให้ค้นหา Xamarin.Essentials ดังรูป

    ที่ฝั่งขวา ให้เราเลือก install ลงทุก project ทั้งในส่วน shared project ตรงกลาง และ specific platform project (android และ ios) แล้วกดปุ่ม Install ดังรูป

    ถึงตอนนี้ Xamarin.Essentials ถูกเพิ่มเข้าไปใน Reference package ของแต่ละ project เรียบร้อย แต่เรายังต้อง Config ค่าเพิ่มเติมนิดหน่อยเฉพาะ android project เท่านั้น (ios project ไม่ต้องทำอะไรก็ใช้งานได้เลย) เพื่อให้ Xamarin.Essential สามารถทำงานได้ โดยทำการเพิ่มเติม code ที่ MainActivity.cs เพื่อ initial Xamarin.Essentials ใน OnCreate() และทำการ override OnrequestPermissionResult() ดัง code ข้างล่าง เป็นอันเสร็จเรียบร้อยพร้อมให้ให้เขียน code เรียกใช้งาน feature ต่างๆ ได้เลยค่ะ

    protected override void OnCreate(Bundle bundle)
    {
        ...
        global::Xamarin.Forms.Forms.Init(this, bundle);
        Xamarin.Essentials.Platform.Init(this, bundle);
        ...
    }
    
    public override void OnRequestPermissionsResult(int requestCode, string[] permissions,
        [GeneratedEnum] Android.Content.PM.Permission[] grantResults)
    {
        Xamarin.Essentials.Platform.OnRequestPermissionsResult(requestCode, permissions, grantResults);
        base.OnRequestPermissionsResult(requestCode, permissions, grantResults);
    }
    

    ตัวอย่าง

    ให้ทำการ using Xamarin.Essentials ที่ class ที่เราจะเรียกใช้งาน หลังจากนั้นสามารถเขียน code ใช้งาน method ต่างๆได้เลยค่ะ ขอยกตัวอย่างบาง feature ดังต่อไปนี้นะคะ

    1. ส่ง SMS

    หากเราต้องการส่ง SMS จาก Xamarin.Forms app ของเรา ก็เขียน code ดังตัวอย่างข้างล่างนี้

    public class SmsTest
    {
        public async Task SendSms(string messageText, string recipient)
        {
            try
            {
                var message = new SmsMessage(messageText, new []{ recipient });
                await Sms.ComposeAsync(message);
            }
            catch (FeatureNotSupportedException ex)
            {
                // Sms is not supported on this device.
            }
            catch (Exception ex)
            {
                // Other error has occurred.
            }
        }
    }
    

    2. Get Location

    อยากรู้ตำแหน่ง Location ล่าสุดของ device ก็เขียน code ดังนี้

    try
    {
        var location = await Geolocation.GetLastKnownLocationAsync();
    
        if (location != null)
        {
            Console.WriteLine($"Latitude: {location.Latitude}, Longitude: {location.Longitude}, Altitude: {location.Altitude}");
        }
    }
    catch (FeatureNotSupportedException fnsEx)
    {
        // Handle not supported on device exception
    }
    

    ผู้เขียนขอยกตัวอย่างเพียงเท่านี้ ส่วนการเรียกใช้งาน feature อื่น สามารถอ่านได้จาก doc ของทาง Microsoft Xamarin.Essentials ได้เลยค่ะ ไม่ยากเลยใช่มั้ยคะ เขียน code เพียงไม่กี่บรรทัด เราก็สามารถเข้าถึง native feature ของแต่ละ platform ได้แล้วว ^^

  • การเชื่อมต่อฐานข้อมูล Oracle ผ่าน Access office 365

    สำหรับหลาย ๆ ท่านนอกเหนือจากที่ต้องมีหน้าที่ในการพัฒนาโปรแกรมเป็นหลักแล้ว อาจจะต้องมีหน้าที่ในการนำเข้าข้อมูลด้วย ตัวเองก็เช่นกันต้องทำหน้าที่ในการนำเข้าข้อมูลเข้าฐานข้อมูล Oracle อยู่เป็นประจำ จริงๆ มีหลายเครื่องมือในการนำเข้าข้อมูล เช่น SQL Developer , Toad for Oracle เป็นต้น แต่บางครั้งก็ไม่สะดวกเพราะบางข้อมูลต้องผ่านการจัดการก่อนถึงจะสามารถถ่ายโอนได้ ตัวเองก็มีอีกวิธีคือ ถ่ายโอนผ่าน Access office 365

    สำหรับบทความในครั้งนี้ ขอนำเสนอวิธีการเชื่อมต่อฐานข้อมูล Oracle ผ่าน Access office 365 เผื่อใครจะใช้เป็นทางเลือกในการจัดการข้อมูลของ Oracle กันค่ะ

    โดยทำตามขั้นตอนดังต่อไปนี้

    STEP 1

    • ติดตั้ง  Oracle Database 12c Release 2 Client for Microsoft Windows (32bit)
    • ตั้งค่า TNS Service name ในการเข้าถึงฐานข้อมูล Oracle ผ่าน Oracle Net Manager โดยมีขั้นตอนดังนี้
      • เปิดโปรแกรม Net Manager
      • คลิกที่ Local -> Service Naming คลิกเครื่องหมาย +
      • ระบบแสดงหน้าต่าง Net Service Name Wizard
      • ขั้นตอนที่ 1 ตรงช่อง Net Service Name ป้อนชื่อที่ต้องการ เช่น TEST_DB คลิกปุ่ม ถัดไป
      • ขั้นนตอนที่ 2 คลิกเลือก TCP/IP (Internet Protocol)  คลิกปุ่ม ถัดไป
      • ขั้นตอนที่ 3 ตรงช่อง Host Name: ป้อนชื่อฐานข้อมูล Oracle ที่ต้องการ เช่น TEST.PSU.AC.TH  ระบุ Port Number: 1521
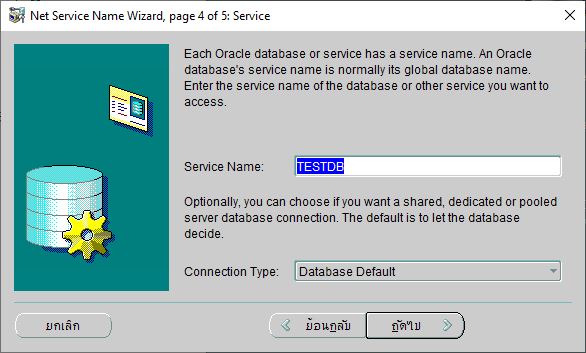
      • ขั้นตอนที่ 4 ตรงช่อง Service Name ให้ใส่ชื่อ Service Name ของ Database ที่ระบุในขั้นตอนที่ 3 คลิกปุ่ม ถัดไป
      • ขั้นตอนที่ 5 ซึ่งเป็นขั้นตอนสุดท้าย เราสามารถคลิกปุ่ม Test เพื่อทดสอบการ connect กับฐานข้อมูล และคลิกปุ่ม เสร็จสิ้น เพื่อสิ้นสุดการการสร้าง Service Naming
    ภาพแสดงการตั้งค่า TNS Service name ขั้นตอนที่ 1
    ภาพแสดงการตั้งค่า TNS Service name ขั้นตอนที่ 2
    ภาพแสดงการตั้งค่า TNS Service name ขั้นตอนที่ 3
    ภาพแสดงการตั้งค่า TNS Service name ขั้นตอนที่ 4
    ภาพแสดงการตั้งค่า TNS Service name ขั้นตอนที่ 5

    STEP 2

    • เปิดโปรแกรม ODBC Data Sources (32-bit)
      • คลิกเลือกแท็บ System DSN คลิกปุ่ม Add…
      • คลิกเลือก driver : Oracle in OraClient 12Home1_32bit ในหน้าต่าง Create New Data Source คลิกปุ่ม Finish
      • ระบบแสดงหน้าต่าง Oracle ODBC Driver Configuration
        • กำหนด Data Source Name และ Description
        • เลือก TNS Service Name จากที่สร้างไว้ในขั้นตอนการตั้งค่า TNS Service name ขั้นตอนที่ 2 (กรณีไม่มีให้เลือกสามารถพิมพ์เองได้)
        • ตรงช่อง User ID ระบุ user / schema  เพื่อ connect เข้าฐานข้อมูล Oracle
        • คลิกปุ่ม OK
    ภาพแสดงหน้าต่างการเลือก driver ของ data source
    ภาพแสดงหน้าต่าง Oracle ODBC Driver Configuration

    STEP 3

    • เปิดโปรแกรม Access office 365
      • คลิกเลือกเมนู External Data -> New Data Source -> From Other Sources -> ODBC Database
      • ระบบแสดงหน้าต่าง Get External Data – ODBC Database
      • คลิกเลือก Link to data source by creating a linked table.
      • คลิกปุ่ม OK
      • ระบบแสดงหน้าต่าง Select Data Source คลิกแท็บ Machine Data Source
      • คลิกเลือก Data Source Name ที่เราได้สร้างไว้แล้ว คลิกปุ่ม OK
      • ระบบแสดงหน้าต่าง Oracle ODBC Driver Connect
      • กรอก Password เพื่อ connect เข้าฐานข้อมูล Oracle คลิกปุ่ม OK
      • ระบบแสดง Link Tables คลิกเลือกตารางที่ต้องการ คลิกปุ่ม OK
    ภาพแสดงหน้าจอหลักของ Access
    ภาพแสดงหน้้าต่าง Get External Data – ODBC Database
    ภาพแสดงหน้าต่าง Select Data Source
    ภาพแสดงหน้าต่าง Oracle ODBC Driver Connect
    ภาพแสดง Link Tables

    จากนั้นตารางที่เราเลือกก็จะมาแสดงให้เราเห็น เราก็สามารถจัดการข้อมูลดังกล่าวผ่าน Access office 365 ได้แล้ว คราวนี้ถ้าต้องการนำเข้าข้อมูลเราก็สามารถใช้ความสามารถของ Access ได้ผ่านตัว Append Query ได้หรือแม้แต่จะปรับปรุงข้อมูลก็สามารถทำได้ผ่านตัว Update Query เป็นต้น

    ภาพแสดงตัวอย่าง Linked Table ของฐานข้อมูล PSU_ADMISSION

  • Xamarin.Forms : Binding ข้อมูลด้วย MVVM pattern

    “MVVM is the best way to architecture mobile apps”

    Asfend Yar Hamid ซึ่งเป็น Microsoft MVP developer ท่านหนึ่งได้กล่าวไว้ เค้าคือใครน่ะเหรอ ผู้เขียนรู้จักเค้าผ่าน Udemy (คอร์สเรียนออนไลน์ที่เค้ากำลังฮอต ราคาถูก คุณภาพดี แอบรีวิว 555) ซึ่งวันนี้ผู้เขียนจะมาแนะนำการ Binding ข้อมูลของ Xamarin.Form app ด้วย MVVM pattern กันนะคะ

    MVVM pattern คืออะไร

    MVVM หรือ Model View ViewModel เป็น design pattern หรือรูปแบบในการวาง architecture ในการเขียน code นั่นเอง โดย

    Model คือ ส่วนที่เก็บข้อมูลของ Application เรา ตัวอย่างเช่น Entity Class หรือไฟล์ POCO Class ของ object ต่างๆ ที่เกี่ยวข้องกับข้อมูลจะอยู่ที่ส่วนนี้


    View คือ ส่วนที่ติดต่อกับ user ซึ่งเป็นส่วนไว้แสดงหน้า app ของเรานั่นเอง ซึ่งView จะไม่รู้อะไรเลยนอกจากการแสดงผล ส่วน Logic อื่นๆจะอยู่ใน ViewModel


    ViewModel คือ ส่วนที่ทำหน้าที่เก็บข้อมูลทั้งหมดที่ View ต้องการ โดย View จะติดต่อ ViewModel ผ่าน Data-binding ซึ่งหาก View มีการเปลี่ยนแปลงก็จะส่งผลต่อ ViewModel ในทางกลับกันหาก ViewModel มีการเปลี่ยนแปลงก็จะส่งผลถึง View ด้วยเช่นกัน


    ทำไมต้องใช้ MVVM กับ mobile app ?

    MVVM ทำให้เราสามารถ separate หรือแยกส่วนการทำงานของ code ออกจากกันได้ชัดเจนตามหน้าที่ของมัน ซึ่งทำให้ง่ายต่อการจัดการ รองรับต่อการเปลี่ยนแปลง เหมาะสำหรับการพัฒนา Application ที่มีการเปลี่ยนแปลง UI บ่อยครั้ง เนื่องจากทุกการเปลี่ยนแปลงในส่วน view จะไม่กระทบต่อ ViewModel ที่เป็น business logic และยังมี Binder ซึ่งเป็นตัวช่วยจัดการการเปลี่ยนแปลงของข้อมูลใน View หรือใน ViewModel ทำให้ไม่จำเป็นต้องเขียน Code ในการควบคุม View เพื่อให้เปลี่ยนแปลงตาม

    เริ่มกันเลยดีกว่า

    เกริ่นไปเยอะแล้ว เรามาลองสร้าง app เพื่อ binding ข้อมูลในรูปแบบ MVVM ดูกันเลยค่ะ
    Step 1 : สร้าง Xamarin.Forms project ขึ้นมาก่อน (วิธีสร้างและเลือก template สามารถอ่านได้จากบทความที่แล้ว => สร้าง Hello World app ง่ายๆด้วย Xamarin.Forms) ซึ่งจะได้ project structure ดังรูป

    ทีนี้เราจะไม่ไปยุ่งในส่วน specific platform project (Android และ iOS) เราจะมาสร้าง MVVM ที่ share project กัน

    Step 2 : สร้างโฟลเดอร์ Model, View และ View Model ขึ้นมา ดังรูป

    Step 3: สร้าง class ชื่อ Employee.cs ลงในโฟลเดอร์ Model โดย code ข้างในมีดังนี้

    using System;
    using System.Collections.Generic;
    using System.Text;
    
    namespace MVVMBinding.Models
    {
        public class Employee
        {
            public string FirstName { get; set; }
            public string LastName { get; set; }
            public string FullName
            {
                get { return string.Format("{0} {1}", FirstName, LastName); }
            }
        }
    }
    

    Step 4 : สร้าง ViewModel ชื่อ EmployeeVM ลงใน โฟลเดอร์ ViewModels โดยใน class นี้จะมีการ inherit และ implement interface ที่ชื่อ INotifyPropertyChanged ซึ่งเป็น interface ที่ช่วยให้ Binder property ทำงาน โดย code มีดังนี้

    using MVVMBinding.Models;
    using System;
    using System.Collections.Generic;
    using System.Collections.ObjectModel;
    using System.ComponentModel;
    using System.Runtime.CompilerServices;
    using System.Text;
    
    namespace MVVMBinding.ViewModels
    {
        public class EmployeeVM : INotifyPropertyChanged
        {
            private ObservableCollection<Employee> _employees;
            public ObservableCollection<Employee> Employees {
                get
                {
                    return this._employees;
                }
                set
                {
                    this._employees = value;
                    OnPropertyChanged();
                }
            }
            public event PropertyChangedEventHandler PropertyChanged;
            protected virtual void OnPropertyChanged(
            [CallerMemberName] string propertyName = null)
            {
                PropertyChanged?.Invoke(this,
                new PropertyChangedEventArgs(propertyName));
            }
    
            public EmployeeVM()
            {
                Employees = new ObservableCollection<Employee>();
            }
    
            public void AddNewEmployee(string fisrtName,string lastName)
            {
                Employee emp = new Employee()
                {
                    FirstName = fisrtName,
                    LastName = lastName
                };
                Employees.Add(emp);
            }
        }
    }
    

    Step 5 : สร้าง page ชื่อ EmployeePage ลงใน folder View โดยในส่วนของ EmployeePage .xaml ส่วนของ ListView จะมีการ Binding ข้อมูล กับ Employees ซึ่งเป็น property หนึ่งของ EmployeeVM สำหรับแสดงผลข้อมูล

    <?xml version="1.0" encoding="utf-8" ?>
    <ContentPage xmlns="http://xamarin.com/schemas/2014/forms"
                 xmlns:x="http://schemas.microsoft.com/winfx/2009/xaml"
                 x:Class="MVVMBinding.Views.EmployeePage">
        <ContentPage.Content>
            <StackLayout>
                <Label Text="My Employee"
                    VerticalOptions="CenterAndExpand" 
                    HorizontalOptions="CenterAndExpand" />
                <StackLayout>
                    <Label Text="ชื่อ"/>
                    <Entry Placeholder="กรอกชื่อ" x:Name="fnameEntry"/>
                    <Label Text="นามสกุล"/>
                    <Entry Placeholder="กรอกนามสกุล" x:Name="lnameEntry"/>
                    <Button x:Name="addBtn" Text="Add" Clicked="AddBtn_Clicked" />
                    <ListView ItemsSource="{Binding Employees}" BackgroundColor="Beige">
                        <ListView.ItemTemplate>
                            <DataTemplate>
                                <ViewCell>
                                    <Label Text="{Binding FullName}"/>
                                </ViewCell>
                            </DataTemplate>
                        </ListView.ItemTemplate>
                    </ListView>
                </StackLayout>
            </StackLayout>
        </ContentPage.Content>
    </ContentPage>
    

    และในส่วนของ code behind=> EmployeePage.xaml.cs ก็ให้เซตค่า BindingContext ไปยัง EmployeeVM ดัง code ต่อไปนี้

    using MVVMBinding.ViewModels;
    using System;
    using System.Collections.Generic;
    using System.Linq;
    using System.Text;
    using System.Threading.Tasks;
    
    using Xamarin.Forms;
    using Xamarin.Forms.Xaml;
    
    namespace MVVMBinding.Views
    {
    	[XamlCompilation(XamlCompilationOptions.Compile)]
    	public partial class EmployeePage : ContentPage
    	{
            private EmployeeVM vm;
            public EmployeePage ()
    		{
    			InitializeComponent ();
                vm = new EmployeeVM();
                this.BindingContext = vm;
    		}
    
            private void AddBtn_Clicked(object sender, EventArgs e)
            {
                vm.AddNewEmployee(fnameEntry.Text, lnameEntry.Text);
                ClearEntry();
            }
            private void ClearEntry()
            {
                fnameEntry.Text = "";
                lnameEntry.Text = "";
            }
        }
    }
    

    Step 6 : เปิดไฟล์ App.xaml.cs ขึ้นมา และเซตค่า MainPage ให้เรียกไปยัง EmployeePage ดัง code ต่อไปนี้

    using MVVMBinding.Views;
    using System;
    using Xamarin.Forms;
    using Xamarin.Forms.Xaml;
    
    [assembly: XamlCompilation(XamlCompilationOptions.Compile)]
    namespace MVVMBinding
    {
        public partial class App : Application
        {
            public App()
            {
                InitializeComponent();
    
                MainPage = new EmployeePage();
            }
    
            protected override void OnStart()
            {
                // Handle when your app starts
            }
    
            protected override void OnSleep()
            {
                // Handle when your app sleeps
            }
    
            protected override void OnResume()
            {
                // Handle when your app resumes
            }
        }
    }
    

    Step สุดท้าย : เสียบสาย Usb เชื่อมต่อระหว่างมือถือกับคอมของเรา build project แล้วก็กดรันโลดดด.. ผลลัพธ์ก็จะออกมาเช่นนี้

    เป็นอันเสร็จสิ้นการสร้าง app Binding ข้อมูลแบบ MVVM pattern ด้วย Xamarin.Forms แล้วนะคะ ซึ่งผู้อ่านสามารถนำไปใช้เป็นแนวทางและประยุกต์ใช้ตามความเหมาะสมกับ app นั้นๆต่อไปค่า ^^
    บทความถัดไป => Xamarin Essentials : Easy access Native Feature Platform