Month: July 2017

  • Test Flight: อัพโหลดแอพลิเคชั่นขึ้นทดสอบบน App Store โดยผู้ใช้จริง

    ไม่ว่าจะพัฒนาแอพลิเคชั่นด้วยวิธีการใดก็ตาม เมื่อพัฒนาเสร็จเรียบร้อย และผ่านการทดสอบจากผู้พัฒนาเองโดยการใช้ Simulator หรืออุปกรณ์ที่ลงทะเบียนไว้ เรียบร้อยแล้ว สำหรับแอพพลิชั่น ที่มีผู้ใช้จำนวนมาก และต้องรองรับกับความหลากหลายของอุปกรณ์ทั้งรุ่นของระบบปฏิบัติการ ขนาดหน้าจอ และฮาร์ดแวร์ จำเป็นต้องมีการทดสอบ โดยผู้ใช้จริงจำนวนหนึ่งเพื่อวัตถุประสงค์ในการลดข้อผิดพลาด เมื่อเปิดให้ใช้งานจริง โดยมีขั้นตอนดังต่อไปนี้

    1. เข้าไปยัง https://itunesconnect.apple.com ทำการ Login ด้วย Apple Developer Account
    2. เลือกเมนู My Apps
    3. จะเข้าสู่หน้าจอจัดการ หากยังไม่มี Application Record ต้องทำการสร้างก่อน โดยคลิกที่ปุ่ม จากนั้นจะได้หน้าจอสำหรับป้อนข้อมูลแอพพลิเคชั่นของเรา กรอกข้อมูลให้ครบถ้วน
    4. จากนั้นกรอกข้อมูลอื่นๆ อัพโหลดภาพตัวอย่างตามข้อกำหนดของ Apple ให้ครบถ้วน (รายละเอียดในส่วนนี้สามารถอ่านเพิ่มเติมจาก https://developer.apple.com/app-store/review)
    5. เมื่อสร้าง Application Record เรียบร้อย เลือกที่ไอคอนแอพลิเคชั่นของเรา จะได้หน้าจอดังรูป
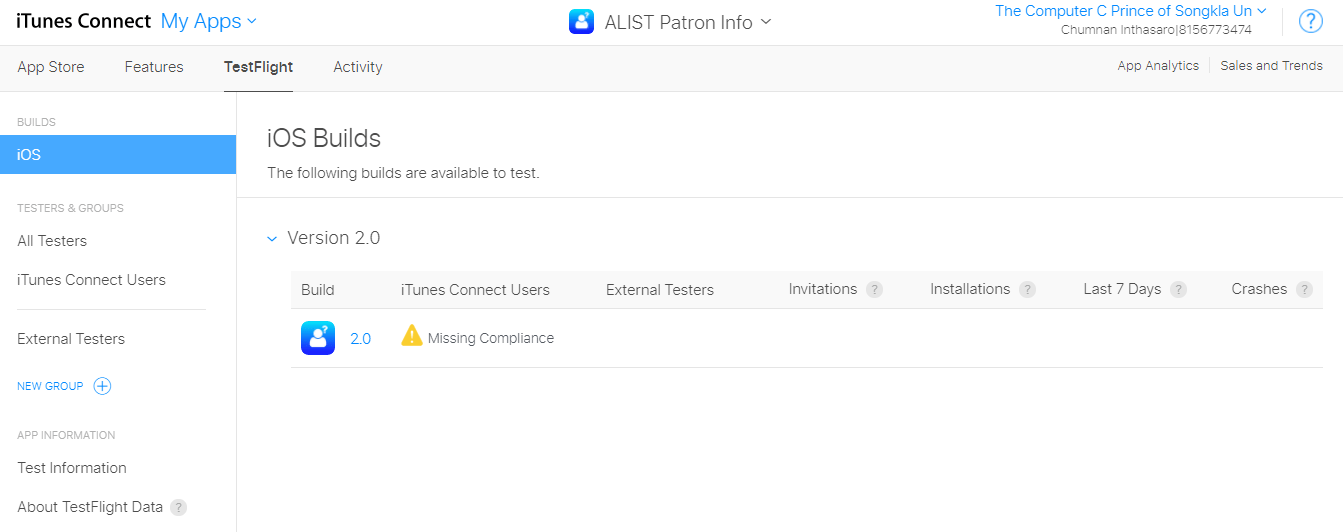
    6. เลือกเมนู TestFlight จะแสดงหน้าจอรายการ Build (ไฟล์ ipa ของแอพลิเคชั่น) ที่เราได้อัพโหลดไว้กรณีไม่ปรากฏดังตัวอย่าง แสดงว่าไม่มี Build ที่อยู่ในสถานะที่จะใช้งาน TestFlight ได้ให้ทำการอัพโหลดใหม่
    7. เมื่ออัพโหลดไฟล์ IPA เรียบร้อยแล้ว จะปรากฏ Build ที่สามารถเปิดให้ทดสอบได้ ดังรูป
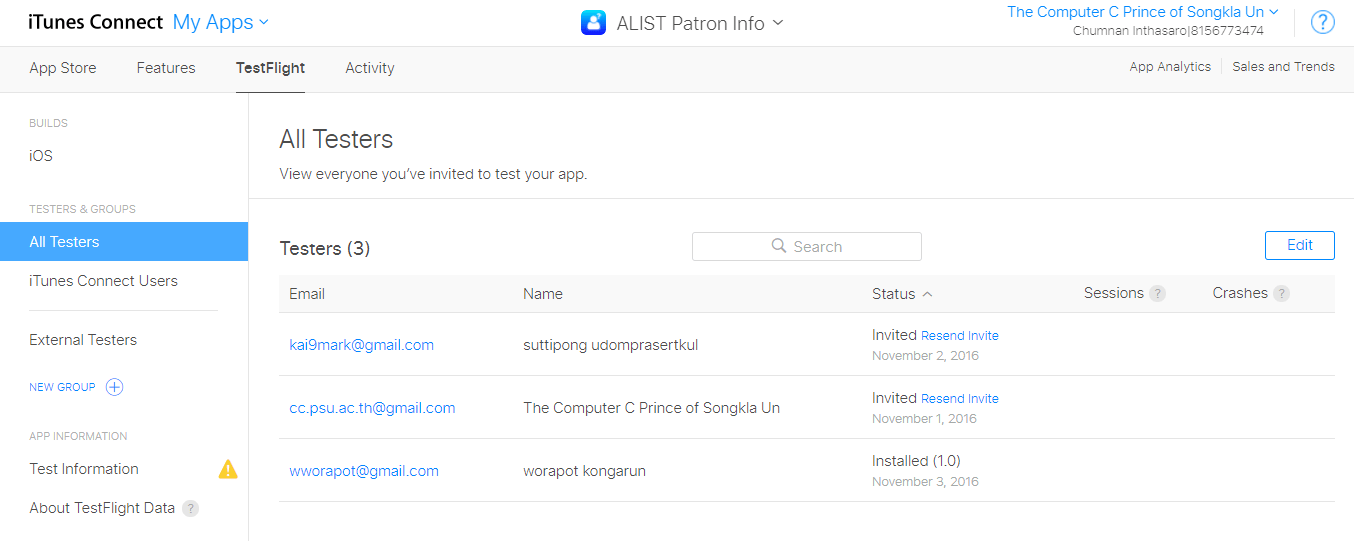
    8. จัดการข้อมูลผู้ทดสอบโดยเลือกเมนู All Testers ด้านซ้ายมือ ในส่วนนี้สามารถทำการลบรายการผู้ทดสอบได้ โดยการกดปุ่ม Edit เลือกรายการที่ต้องการลบ จะปรากฏเมนูปุ่ม Remove ให้สามารถลบได้
    9. หากต้องการเพิ่มผู้ทดสอบจะต้องเลือกเมนู iTunes Connect Users (อีเมลที่ได้รับการเพิ่มเป็นสมาชิกของทีมใน Apple Developer Account) หรือ External Testers (อีเมลอื่นๆ) โดยสามารถกดปุ่ม จากนั้นสามารถเลือกได้ว่าจะเพิ่มรายบุคคล หรือโหลดจากไฟล์ CSV
    10. เมื่อมีรายการผู้ทดสอบครบถ้วนแล้วให้กลับไปที่เมนู Build คลิกเลือก จะปรากฏหน้าจอสำหรับเลือกผู้ทดสอบที่ต้องการให้ทดสอบ Build นี้ โดยสามารถเพิ่มจากชื่อกลุ่ม หรือ รายบุคคลก็ได้
    11. จากนั้นกรอกข้อมูลสำหรับทำ External Testing โดยคลิกที่เมนู Test Information กรอกข้อมูลให้ครบถ้วน
    12. เมื่อเสร็จกระบวนการข้างต้น ผู้ทดสอบที่เป็นสมาชิกภายใน (อีเมลที่ลงทะเบียนเป็น Member ของ Apple Developer Account) จะได้รับอีเมล Invite สามารถทดสอบได้ทันที ส่วนผู้ทดสอบภายนอกจะต้องรอให้ผ่านกระบวนการรีวิวจากทาง Apple 
    13. จากนั้นแจ้งให้ผู้ใช้ดาวส์โหลด TestFlight App เพียงเท่านี้ก็สามารถโหลดแอพของเรา และทดสอบการใช้งานแอพบนเครื่องที่ใช้งานจริงได้แล้วครับ


  • Fixed Table Header Scrolling

    ในปัจจุบันในการพัฒนา website  เราจะเห็นว่า Table เกือบจะเป็นส่วนหนึ่งในการพัฒนาของแต่ละหน้า  ซึ่งส่วนใหญ่จะเป็นการแสดงผลของการค้นหาข้อมูลต่างๆของเมนูหรือหัวข้อในแต่ล่ะเรื่อง บ้างก็อาจจะมีข้อมูลน้อย บ้างก็อาจจะมีข้อมูลเยอะ ทำให้การแสดงผลมีความยาวล้นหน้าเพจ ถึงแม้ว่าปัจจุบันจะมีการนำ paging มาใช้แต่ในบางกรณีอาจจะมีความจำเป็นที่ต้องการตรวจสอบข้อมูลในการค้นหาทั้งหมดในหน้าเดียวกัน  แต่ปัญหาที่ตามมาในการแสดงผลทั้งหมดในหน้าเดียวกันก็คือเมื่อเรา scroll ลงมาข้างล่างสุด Header ของตัวตารางจะไม่ Fixed ไว้ และเลื่อนหายไปข้างบน ทำให้ยากลำบากในการตรวจสอบข้อมูล เนื่องจากผู้ใช้งานอาจจะลืมว่าคอลัมภ์ที่กำลังตรวจสอบอยู่นั้นคือคอลัมภ์อะไร จึงต้อง scroll ขึ้นไปดู Header อีกครั้ง ทำให้มีความล่าช้าในการตรวจสอบข้อมูล วันนี้จึงนำวิธีการ Fixed Header ของตาราง โดยใช้ css มาเสนอเพื่อเป็นแนวทางในการพัฒนากับผู้อ่าน ดังนี้ค่ะ


    ตัวอย่างที่1 (CSS ในหน้า Html เดียวกัน))

    tbody {

    display:block;

    height:400px;

    overflow:auto;

    }

    thead, tbody tr {

    display:table;

    width:100%;

    table-layout:fixed;

    }

    thead {

    width: calc( 100% – 1em )

    }

    ตัวอย่างที่1(การเรียกใช้ CSS ในหน้า Html เดียวกัน)

    <table id=”tableSearch” class=”table table-responsive table-hover” style=”border-collapse:collapse;border:1px solid #C0C0C0;table-layout:auto;width:1500px;”>

    <thead>

    <tr class=”filters” style=”background-color:#C0C0C0″>

    <th align=”left”>Order</th>

    <th align=”left”>Name</th>

    </tr></thead>

    <tbody><tr>

    <td colspan=”14″ style=”text-align:center;color:#808080 “>Order</td>

    <td colspan=”14″ style=”text-align:center;color:#808080 “>Name</td>

    </tr></tbody>

    </table>

    ตัวอย่างที่2 (CSS)

    html, body{

    margin:0;

    padding:0;

    height:100%;

    }

    section {

    position: relative;

    border: 1px solid #000;

    padding-top: 37px;

    background: #500;

    }

    section.positioned {

    position: absolute;

    top:100px;

    left:100px;

    width:800px;

    box-shadow: 0 0 15px #333;

    }

    .container {

    overflow-y: auto;

    height: 200px;

    }

    table {

    border-spacing: 0;

    width:100%;

    }

    td + td {

    border-left:1px solid #eee;

    }

    td, th {

    border-bottom:1px solid #eee;

    background: #ddd;

    color: #000;

    padding: 10px 25px;

    }

    th {

    height: 0;

    line-height: 0;

    padding-top: 0;

    padding-bottom: 0;

    color: transparent;

    border: none;

    white-space: nowrap;

    }

    th div{

    position: absolute;

    background: transparent;

    color: #fff;

    padding: 9px 25px;

    top: 0;

    margin-left: -25px;

    line-height: normal;

    border-left: 1px solid #800;

    }

    th:first-child div{

    border: none;

    }

    ตัวอย่างที่2(การเรียกใช้ CSS)

    <section class=””>

    <div class=”container”>

    <table>

    <thead>

    <tr class=”header”>

    <th>

    Table attribute name

    <div>Table attribute name</div>

    </th>

    <th>

    Value

    <div>Value</div>

    </th>

    <th>

    Description

    <div>Description</div>

    </th>

    </tr>

    </thead>

    <tbody>

    <tr>

    <td>align</td>

    <td>left, center, right</td>

    <td>Not supported in HTML5. Deprecated in HTML 4.01. Specifies the alignment of a table according to surrounding text</td>

    </tr>

    <tr>

    <td>bgcolor</td>

    <td>rgb(x,x,x), #xxxxxx, colorname</td>

    <td>Not supported in HTML5. Deprecated in HTML 4.01. Specifies the background color for a table</td>

    </tr>

    <tr>

    <td>border</td>

    <td>1,””</td>

    <td>Specifies whether the table cells should have borders or not</td>

    </tr>

    <tr>

    <td>cellpadding</td>

    <td>pixels</td>

    <td>Not supported in HTML5. Specifies the space between the cell wall and the cell content</td>

    </tr>

    <tr>

    <td>cellspacing</td>

    <td>pixels</td>

    <td>Not supported in HTML5. Specifies the space between cells</td>

    </tr>

    <tr>

    <td>frame</td>

    <td>void, above, below, hsides, lhs, rhs, vsides, box, border</td>

    <td>Not supported in HTML5. Specifies which parts of the outside borders that should be visible</td>

    </tr>

    <tr>

    <td>rules</td>

    <td>none, groups, rows, cols, all</td>

    <td>Not supported in HTML5. Specifies which parts of the inside borders that should be visible</td>

    </tr>

    <tr>

    <td>summary</td>

    <td>text</td>

    <td>Not supported in HTML5. Specifies a summary of the content of a table</td>

    </tr>

    <tr>

    <td>width</td>

    <td>pixels, %</td>

    <td>Not supported in HTML5. Specifies the width of a table</td>

    </tr>

    </tbody>

    </table>

    </div>

    </section>

    ตัวอย่างที่3(การเรียกใช้ CSS)

    @header_background_color: #333;

    @header_text_color: #FDFDFD;

    @alternate_row_background_color: #DDD;

    @table_width: 750px;

    @table_body_height: 300px;

    @column_one_width: 200px;

    @column_two_width: 200px;

    @column_three_width: 350px;

    .fixed_headers {

    width: @table_width;

    table-layout: fixed;

    border-collapse: collapse;

    th { text-decoration: underline; }

    th, td {

    padding: 5px;

    text-align: left;

    }

    td:nth-child(1), th:nth-child(1) { min-width: @column_one_width; }

    td:nth-child(2), th:nth-child(2) { min-width: @column_two_width; }

    td:nth-child(3), th:nth-child(3) { width: @column_three_width; }

    thead {

    background-color: @header_background_color;

    color: @header_text_color;

    tr {

    display: block;

    position: relative;

    }

    }

    tbody {

    display: block;

    overflow: auto;

    width: 100%;

    height: @table_body_height;

    tr:nth-child(even) {

    background-color: @alternate_row_background_color;

    }}}

    .old_ie_wrapper {

    height: @table_body_height;

    width: @table_width;

    overflow-x: hidden;

    overflow-y: auto;

    tbody { height: auto; }

    }

    ตัวอย่างที่3(การเรียกใช้ CSS)

    <table class=”fixed_headers”>

    <thead>

    <tr>

    <th>Name</th>

    <th>Color</th>

    <th>Description</th>

    </tr>

    </thead>

    <tbody>

    <tr>

    <td>Apple</td>

    <td>Red</td>

    <td>These are red.</td>

    </tr>

    <tr>

    <td>Pear</td>

    <td>Green</td>

    <td>These are green.</td>

    </tr>

    <tr>

    <td>Grape</td>

    <td>Purple / Green</td>

    <td>These are purple and green.</td>

    </tr>

    <tr>

    <td>Orange</td>

    <td>Orange</td>

    <td>These are orange.</td>

    </tr>

    <tr>

    <td>Banana</td>

    <td>Yellow</td>

    <td>These are yellow.</td>

    </tr>

    <tr>

    <td>Kiwi</td>

    <td>Green</td>

    <td>These are green.</td>

    </tr>

    <tr>

    <td>Plum</td>

    <td>Purple</td>

    <td>These are Purple</td>

    </tr>

    <tr>

    <td>Watermelon</td>

    <td>Red</td>

    <td>These are red.</td>

    </tr>

    <tr>

    <td>Tomato</td>

    <td>Red</td>

    <td>These are red.</td>

    </tr>

    <tr>

    <td>Cherry</td>

    <td>Red</td>

    <td>These are red.</td>

    </tr>

    <tr>

    <td>Cantelope</td>

    <td>Orange</td>

    <td>These are orange inside.</td>

    </tr>

    <tr>

    <td>Honeydew</td>

    <td>Green</td>

    <td>These are green inside.</td>

    </tr>

    <tr>

    <td>Papaya</td>

    <td>Green</td>

    <td>These are green.</td>

    </tr>

    <tr>

    <td>Raspberry</td>

    <td>Red</td>

    <td>These are red.</td>

    </tr>

    <tr>

    <td>Blueberry</td>

    <td>Blue</td>

    <td>These are blue.</td>

    </tr>

    <tr>

    <td>Mango</td>

    <td>Orange</td>

    <td>These are orange.</td>

    </tr>

    <tr>

    <td>Passion Fruit</td>

    <td>Green</td>

    <td>These are green.</td>

    </tr>

    </tbody>

    </table>

    <!–[if lte IE 9]>

    </div>

    <!–<![endif]–>

    จากข้อความข้างต้นผู้เขียนได้นำตัวอย่างการ Fixed Header ของ Table โดยใช้ CSS มาให้เลือกใช้ 3 แบบ หวังว่าคงเป็นแนวทางสำหรับการนำไปใช้สำหรับการพัฒนาที่ต้องการแสดงข้อมูลจำนวนมากในหน้าเดียวกัน และต้องการ Freeze Header ของตารางเพื่อตรวจสอบความถูกต้องของข้อมูลนะคะ

    แหล่งอ้างอิง
    https://codepen.io/tjvantoll/pen/JEKIu